React [w]orkshop: React Component Lifecycle with Examples
Understand different phases of React lifecycle and component methods with examples explained.
)}
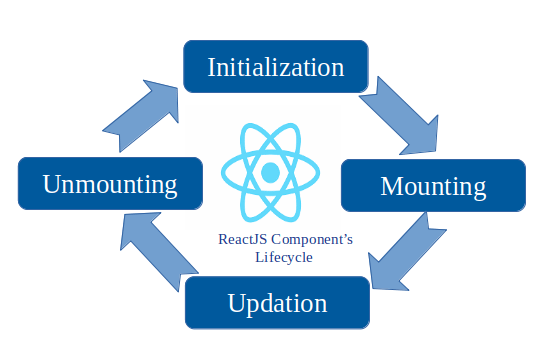
Table of Content
- What is React lifecycle
- Constructor
- Render
- shouldComponentUpdate
- componentDidMount
- componentWillUnmount
- componentDidUpdate
- More about lifecycle
- Summary
What is React lifecycle
In the world of ReactJS, a web page is divided into various components and each component defines a view or a part of a view.
Every component has a lifecycle of its own. How it will be rendered. Basically, component has three stats: Mounting, Updating, and Unmounting. There are a series of methods that are executed at different stages of execution. Let’s find out.
Constructor
This is the very first life-cycle of the component that is being invoked as soon as the component is called.
We can create our App like:
import React, { Component } from 'react';

class App extends Component {
  constructor() {
    super()
    console.log('App created')
  }

  render() {
    return (
      <div>
      </div>
    )
  }
}

export default App
After testing, you will find a page is successfully rendered and print App created on the console.
Let’s add a new class Title, hide it away before we click a buttom to show it. We put console.log in constructor function by checking if class Title’s constorcutor is called when we click a buttom.
import React, { Component } from 'react';

class Title extends Component {
  constructor() {
    super()
    console.log('Title created')
  }
  render() {
    return (
      <h1> title </h1>
    )
  }
}

class App extends Component {
  constructor() {
    super()
    this.state = {
      isShow: false
    }
    console.log('App created')
  }

  render() {
    const {isShow} = this.state
    return (
      <div>
        {isShow && <Title />}
        <button onClick={() => {
          this.setState({
            isShow: !this.state.isShow
          })
        }}>toggle</button>
      </div>
    )
  }
}

export default App
It works like this:
- Initially,
isShow = false, there is nothing butApp created. - After clicking toggle,
isShow = true, the state is changed, Title component is rendered and console printstitle created
Summary:
Constructor is a function will be called automatically when a component is created. Constructor is usually used to initialize compoenent with props, but it’s not necessary if no property to pass.
Render
After being constructed, the render life-cycle is called which can be considered to be the core of the React component as it is the function that returns the JSX or JS code to show to the user. Basically the program goes throgh the main code and pictures it.
An example of render lifecycle can be the following:
render() {
    return (
        <p>Hellow world</p>
    );
}
shouldComponentUpdate
Let’s build a simple App to understand how it works.
import React, { Component } from 'react';

class App extends Component {
  constructor(props) {
    super(props)
    this.state = {
      number: 1
    }
  }

  render() {
    const { number } = this.state
    return (
      <div>
        <h1>{number}</h1>
        <div onClick={() => {
          this.setState({
            number: this.state.number + 1
          })
        }}>click me</div>
      </div>
    )
  }
}

export default App
This example shows the value increased and component re-rendered with a click.
We can use shouldComponentUpdate() to let React know if a component’s output is not affected by the current change in state or props.
shouldComponentUpdate() is invoked before rendering when new props or state are being received:
- receive state/props
- shouldComponentUpdate()
- render
shouldComponentUpdate() returns true by default.
shouldComponentUpdate(nextProps, nextState){
    return true;
}
The render() function will not be invoked if shouldComponentUpdate() returns false
Let’s try to skip rendering on 3.
shouldComponentUpdate(nextProps, nextState) {
 console.log(nextState)
  if (nextState.number === 3) {
    return false;
  }
  return true;
}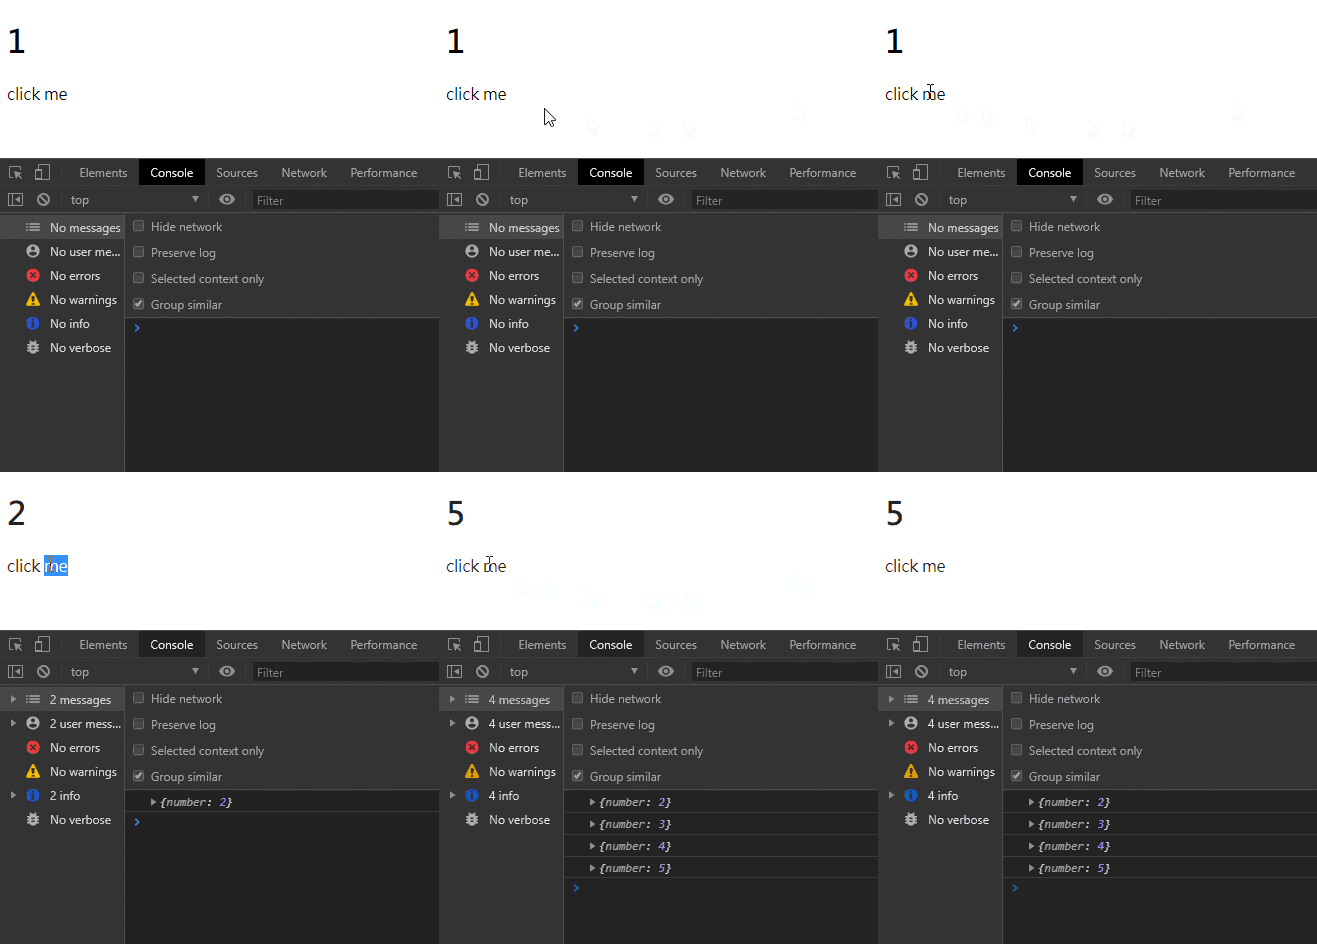
We can see, the component’s render() didn’t invoke on nextState.numer === 3.
The proper use of shouldComponentUpdate() can eliminate some unnecessary render and optimize the performance.
The use case can be the following: CodeSandbox
import React, { Component } from 'react';
class Title extends Component {
  // stop re-render if the props stay the same.
  shouldComponentUpdate(nextProps) {
    if (nextProps.title !== this.props.title) {
      return true;
    }
    return false;
  }
  render() {
    console.log('title render')
    return <h1>{this.props.title}</h1>
  }
}
class App extends Component {
  constructor(props) {
    super(props)
    this.state = {
      number: 1
    }
  }
  render() {
    const { number } = this.state
    return (
      <div>
        <h1>{number}</h1>
        <Title title={'hello world'} />
        <div onClick={() => {
          this.setState({
            number: this.state.number + 1
          })
        }}>click me</div>
      </div>
    )
  }
}
export default App
componentDidMount
What is the meaning of DidMount?
componentDidMount() is invoked immediately after a component is mounted (inserted into the DOM tree).
Let’s test componentDidMount() is invoked after a component is inserted into the tree.
import React, { Component } from 'react';
class Title extends Component {
  render() {
    return <h1>hello</h1>
  }
}
class App extends Component {
  constructor(props) {
    super(props)
    this.state = {
      showTitle: true
    }
    console.log('created', document.querySelector('.test-app'))
  }
  componentDidMount() {
    console.log('mount', document.querySelector('.test-app'))
  }
  render() {
    const { showTitle } = this.state
    return (
      <div>
        <div className='test-app' onClick={() => {
          this.setState({
            showTitle: !this.state.showTitle
          })
        }}>toggle</div>
        {showTitle && <Title />}
      </div>
    )
  }
}
export default App
We can get the result from the console.

This method is a good place to set up any subscription. For example, you may call setState() immediately in componentDidMount(). It will trigger an extra rendering, but it will happen before the browser updates the screen.
Let’s try another example: CodeSandbox
import React, { Component } from 'react';
class Title extends Component {
  constructor(props) {
    super(props)
    this.state = {
      title: 'hello'
    }
  }
  componentDidMount() {
    setTimeout(() => {
      this.setState({
        title: 'ya!'
      })
    }, 2000)
  } // the title will be changed in 2 sec.
  render() {
    return <h1>{this.state.title}</h1>
  }
}
class App extends Component {
  constructor(props) {
    super(props)
    this.state = {
      showTitle: true
    }
    console.log('created', document.querySelector('.test-app'))
  }
render() {
    const { showTitle } = this.state
    return (
      <div>
        <div className='test-app' onClick={() => {
          this.setState({
            showTitle: !this.state.showTitle
          })
        }}>toggle</div>
        {showTitle && <Title />}
      </div>
    )
  }
}
export default App
The Title component will be updated in 2 second.

Here’s a question pops into my mind, what if I remove this DOM before it updates?
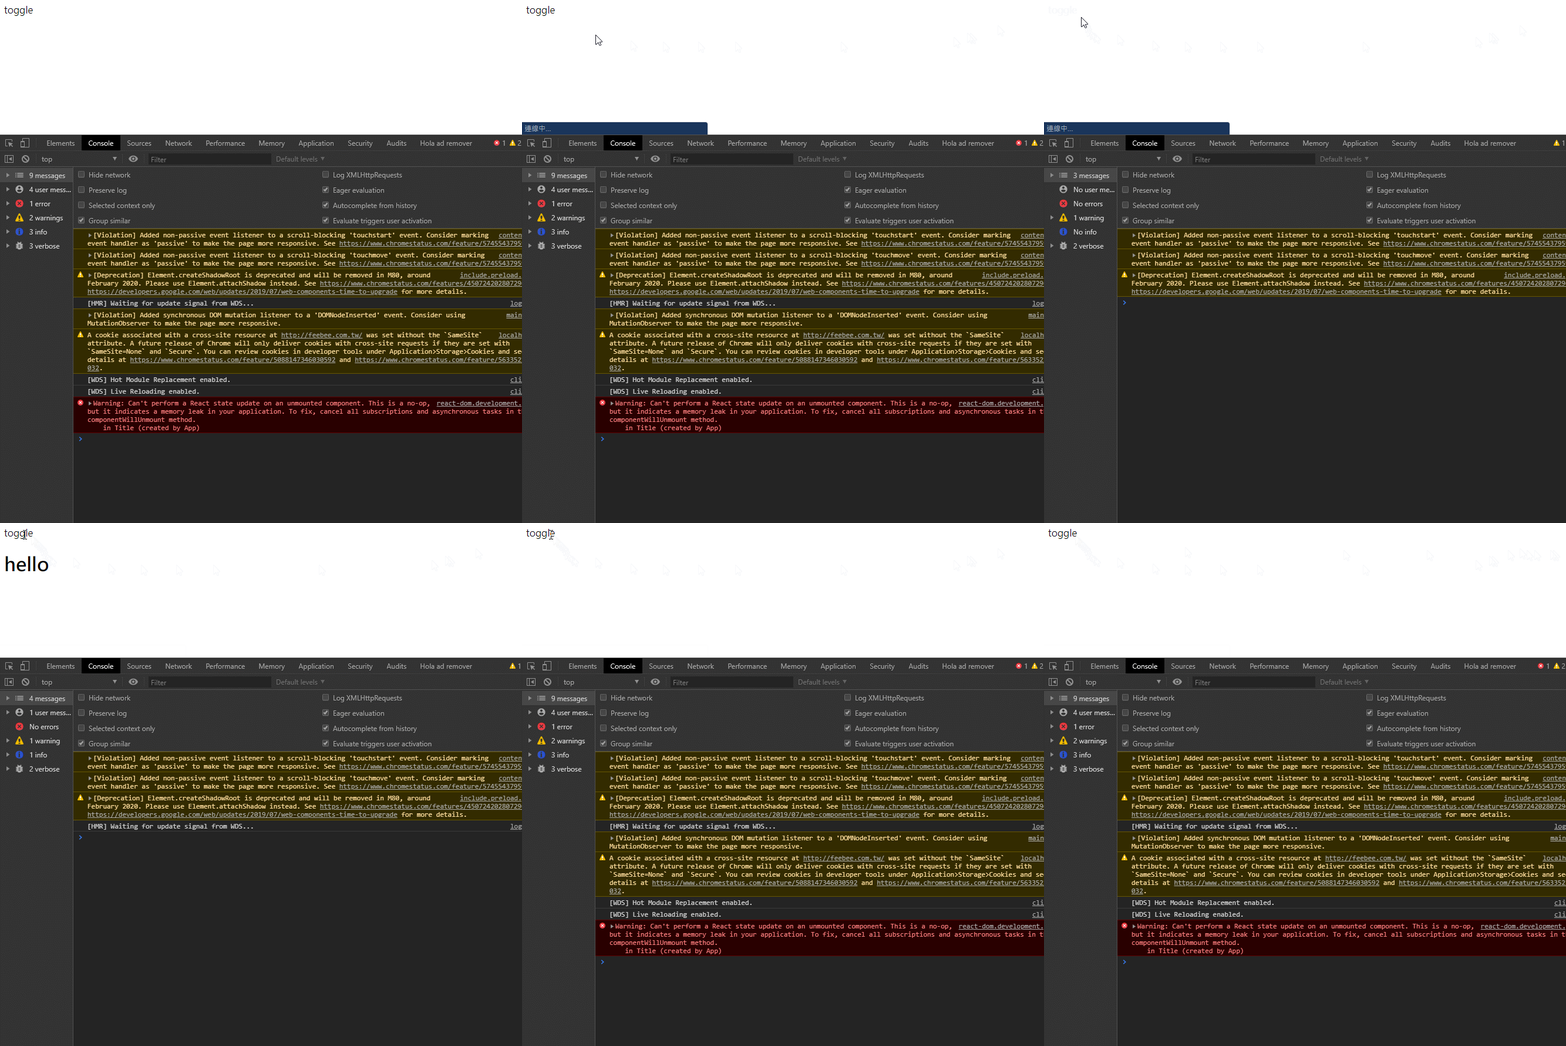
Here’s a warning comes: Can't perform a React state update on an unmounted component.

This warning occurs because the DOM element is gone before the callback function that calls setState.
In this case, we need the function below to solve this problem.
componentWillUnmount
DidMount means the component is mounted, therefore, WillUnmount means this function is invoked immediately before a component is unmounted and destroyed. Perform any necessary cleanup in this method.
Modify the example above: CodeSandbox
import React, { Component } from 'react';
class Title extends Component {
  constructor(props) {
    super(props)
    this.state = {
      title: 'hello'
    }
  }
  componentDidMount() {
    this.timer = setTimeout(() => {
      this.setState({
        title: 'ya!'
      })
    }, 2000)
  } // the title will be changed in 2 sec.
  componentWillUnmount() {
    console.log('will unmount')
    clearTimeout(this.timer)
  }
  render() {
    return <h1>{this.state.title}</h1>
  }
}
class App extends Component {
  constructor(props) {
    super(props)
    this.state = {
      showTitle: true
    }
  }
render() {
    const { showTitle } = this.state
    return (
      <div>
        <div className='test-app' onClick={() => {
          this.setState({
            showTitle: !this.state.showTitle
          })
        }}>toggle</div>
        {showTitle && <Title />}
      </div>
    )
  }
}
export default App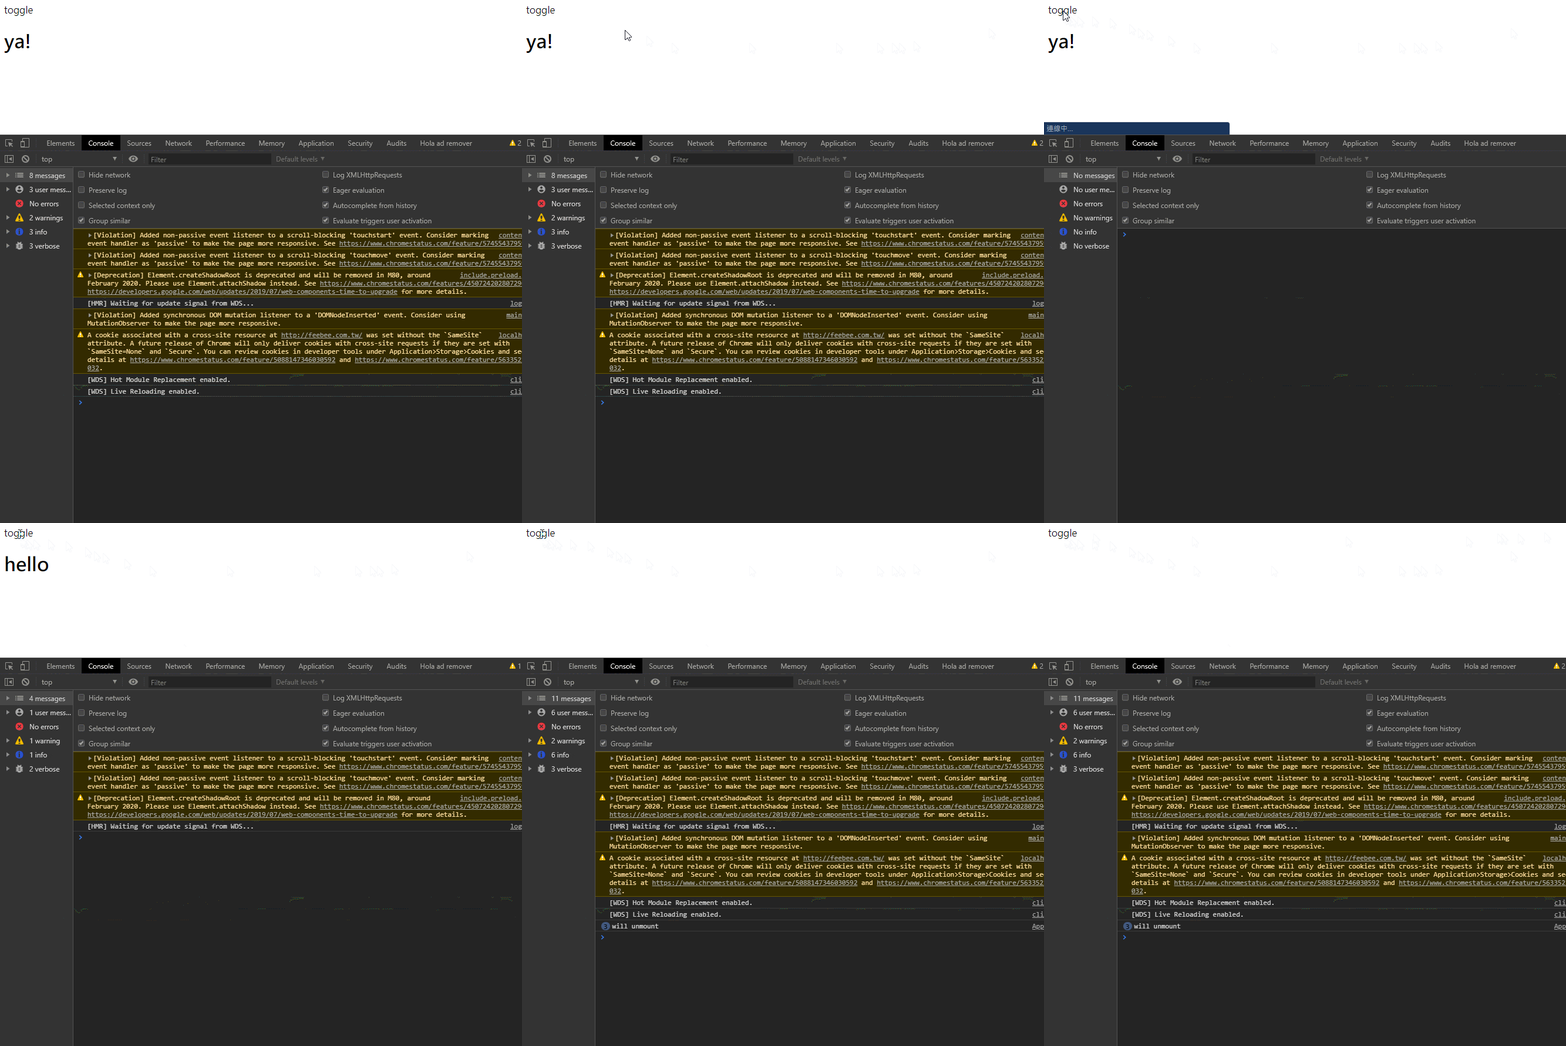
We can tell that componentWillUnmount() is invoked before the title component is about to unmount.
componentDidUpdate
componentDidUpdate() is invoked after updating occurs and not before initial render.
Look at the example that runs without componentDidUpdate
import React, { Component } from 'react';

class App extends Component {
  constructor(props) {
    super(props)
    this.state = {
      apple: 1,
      orange: 1,
      banana: 1
    }
    this.addApple = this.addApple.bind(this);
    this.addOrange = this.addOrange.bind(this);
    this.addBanana = this.addBanana.bind(this);
  }

  log() {
    const { apple, orange, banana } = this.state
    console.log(apple, orange, banana)
  }

  addApple() {
    this.setState({
      apple: this.state.apple + 1
    })
    this.log()
  }

  addOrange() {
    this.setState({
      orange: this.state.orange + 1
    })
    this.log()
  }

  addBanana() {
    this.setState({
      banana: this.state.banana + 1
    })
    this.log()
  }

  render() {
    const { apple, orange, banana } = this.state
    return (
      <div>
        <div>
          apple: {apple}
          <button onClick={this.addApple}>+1</button>
        </div>
        <div>
          orange: {orange}
          <button onClick={this.addOrange}>+1</button>
        </div>
        <div>
          banana: {banana}
          <button onClick={this.addBanana}>+1</button>
        </div>
      </div>
    )
  }
}

export default App
In this case, there are 3 bottons, each botton will increase the quantity of its fruit type with a click.
In order to print out the number of the fruits in console, we create a function log() to do so.
However, the output is not what we expected.

Because .setState() is asynchronous, log() print out the result before .setState() finishes.
That is why the second parameter of setState() is a callback function, we can put print action in the second parameter.
addOrange() {
  this.setState({
    orange: this.state.orange + 1
  }, this.log) // remove parentheses to become a callback function
}
However, whenever we add a new furit type, we need to add another linstener, create a new setState() that take this.log() as a callback. That will be troublesome.
componentWillUpdate can sort this out easily. You can change data on basis of props changes by comparing this.props and prevProps
componentDidUpdate(prevProps, prevState) {
  if (prevProps.apple !== this.state.apple
    || prevProps.orange !== this.state.orange
    || prevProps.banana !== this.state.banana
    ) {
      this.log()
  }
}
Here’s the full version of the code: CodeSandbox
import React, { Component } from "react";

class App extends Component {
  constructor(props) {
    super(props);
    this.state = {
      apple: 1,
      orange: 1,
      banana: 1
    };
    this.addApple = this.addApple.bind(this);
    this.addOrange = this.addOrange.bind(this);
    this.addBanana = this.addBanana.bind(this);
  }

  log() {
    const { apple, orange, banana } = this.state;
    console.log(apple, orange, banana);
  }

  componentDidUpdate(prevProps, prevState) {
    if (
      prevProps.apple !== this.state.apple ||
      prevProps.orange !== this.state.orange ||
      prevProps.banana !== this.state.banana
    ) {
      this.log();
    }
  }

  addApple() {
    this.setState({
      apple: this.state.apple + 1
    });
  }

  addOrange() {
    this.setState({
      orange: this.state.orange + 1
    });
  }

  addBanana() {
    this.setState({
      banana: this.state.banana + 1
    });
  }

  render() {
    const { apple, orange, banana } = this.state;
    return (
      <div>
        <div>
          apple: {apple}
          <button onClick={this.addApple}>+1</button>
        </div>
        <div>
          orange: {orange}
          <button onClick={this.addOrange}>+1</button>
        </div>
        <div>
          banana: {banana}
          <button onClick={this.addBanana}>+1</button>
        </div>
      </div>
    );
  }
}

export default App;
More about lifecycle
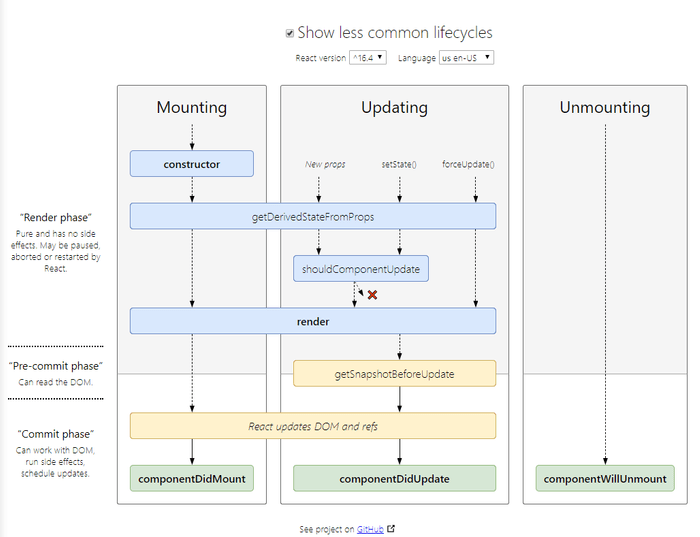
Here is a React Lifecycle Methods diagram for reference.
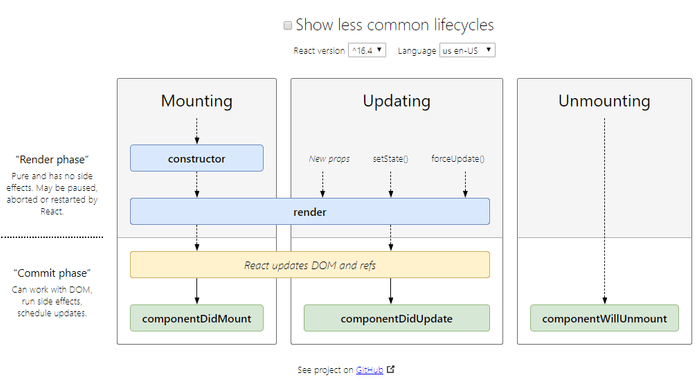
The React lifecycle is divided into 3 stage: Mounting, Updating, Unmounting.
The more comprehensive diagram:
Summary
There are many lifecycle methods, all of them are tightly connectecd to render. By using these methods, we can have a better control on render.
Make a good use of them and you experience with working React will be more enjoyable.

![React [w]orkshop: useContext + useReducer = Redux](https://github.com/lokissue/luomingzhang.com/blob/master/static/media/react-post/react-hooks.png?raw=true)